13.2. Building a ROS2 node on the flight side to talk with cFS
In the previous tutorial, we simulate the actuator behavior within the cFS application using a simple PID controller. In reality, the actuator will be hardware and thus it can receive commands and send back state data. Depending on the user case, the hardware could talk directly with cFS, or it could also talk with ROS2 (E.g. using ros2 control). For cases like this, we’ll need to make the robot control code in ROS2 talk with cFS using one more bridge on the flight side.
The figure below shows how our system will look at the end of this tutorial:
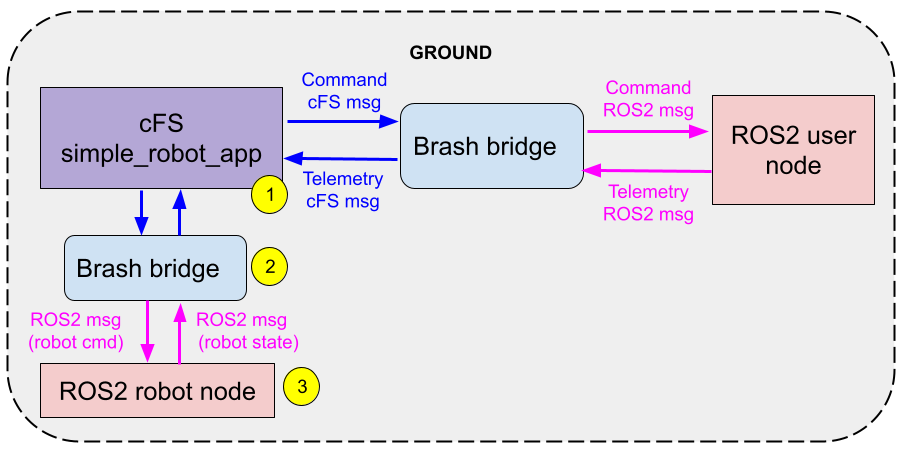
We coded the right side of the diagram already in the previous tutorial. In this one, we’ll do the following 4 steps in order to communicate our cFS app with a ROS2 node on the flight side :
We’ll go through the following 4 steps to communicate our cFS app with a ROS2 app:
Modify the cFS app to talk to the robot : This means, that cFS will output the command data received from ground and will receive the actuator state as input.
Generate ROS2 messages : Corresponding to the 2 new cFS messages added.
Update the BRASH bridge’s configuration files We’ll use the SBN bridge for this.
Create a ROS2 robot node that controls the actuator.
Although in this tutorial we are going to build the flight side , we’ll still run everything on a single machine. In the next and final tutorial we’ll run things in 2 different machines.
Note
For this tutorial, we assume you have followed the previous one
13.2.1. Step 1: Modify the cFS app to talk to a ROS2 node on the flight side
You’ll continue using the simple_robot_app, but switch now to a branch that has the updates for talking to the flight side.
$ cd ~/test_brash/cFS/apps/simple_robot_app
$ git checkout tutorial/add_flight_side
The app is already integrated in the cFS build, so we can just go ahead and rebuild the code. If you take a look at the updates in this branch, you’ll notice that we added 2 messages in
simple_robot_app/fsw/src/simple_robot_app_msg.h:///////////////////////////// // Flight side ///////////////////////////// typedef struct { CFE_MSG_TelemetryHeader_t TlmHeader; /**< \brief Telemetry header */ SimpleRobotAppJointConfig_t joint_goal; /**< \brief Command */ float max_time; } SimpleRobotAppFlightCmd_t; typedef struct { CFE_MSG_CommandHeader_t CmdHeader; /**< \brief Telemetry header */ SimpleRobotAppJointConfig_t joint_state; /**< \brief Command */ bool is_robot_moving; } SimpleRobotAppFlightTlm_t;
We’ll use these messages to talk to the robot on the flight side. Take a look at the changes in the source code (
simple_robot_app.c) to see what is going on.Compile :
$ cd ~/test_brash/cFS
$ make && make install
13.2.2. Step 2: Generate ROS2 messages
Similar to the previous tutorial, we need to generate the ROS2 messages for the new cFS messages added in the previous step:
Generate the juicer database. Your launch file must be ready to use from the last tutorial (with updated locations for your local cFS and juicer), so you can just launch ahead:
$ cd ~/test_brash/brash
$ ros2 launch juicer_util generate_juicer_database.launch.py
Replace the old database with the one you just generated.
$ cd ~/test_brash/brash/src/cfe_ros2_bridge_plugin/cfe_plugin/resource
$ ls # You'll see the cfs_bootes-rc1-dev83_TL.sqlite
$ mv ~/test_brash/juicer/dbs/combined.sqlite cfs_bootes-rc1-dev83_TL.sqlite
Run the converter. This will create new .msg files for the app within the cfe_msgs folder. Compile afterwards.
$ cd ~/test_brash/brash
$ ros2 launch cfe_msg_converter  cfe_msg_converter.launch.py
$ colcon build --symlink-install --packages-up-to cfe_msgs
You should see 2 new messages being generated:
SimpleRobotAppFlightCmdtSimpleRobotAppFlightTlmt
13.2.3. Step 3: Update config file for ground bridge
Finally! You’ll need to tell the bridges about your new messages, so they can know to hear for them. For the flight side, you’ll need to update the cfe_sbn_bridge, which connects the flight side with cfe:
The SimpleRobot app has 2 generated messages for the flight side:
SimpleRobotAppFlightTlmt.msg: Message that contains telemetry data (current joint state) that is sent from the robot to cfe.
SimpleRobotAppFlightCmdt.msg: Message that sends commands (joint state goal) from cfe to the robot.
We’ll use these 2 messages to receive the joint state telemetry and send the joint command data to cfe. For this, we need to let the bridge know some info about these messages:
Open the cfe_plugin_config.yaml file:
$ cd ~/test_brash/brash/src/cfe_ros2_bridge_plugin/juicer_util/config
$ gedit cfe_sbn_plugin_config.yaml
In the commands and telemetry sections, add references for the first 2 messages:
/**:
  ros__parameters:
    plugin_params:

      juicer_db: ["cfs_bootes-rc1-dev83_TL.sqlite"]
      map_ros_name: ["src/cfe_ros2_bridge_plugin/cfe_msg_converter/config/map_ros_name.yaml"]
      commands: ["CPU1CFEESStopAppCmd", "CPU1CFEESRestartAppCmd", ...,
+      "simple_robot_app_flight_tlm"]
      telemetry: ["CPU1CFEESOneAppTlm", "CPU1CFEESMemStatsTlm", ...,
+      "simple_robot_app_flight_cmd"]
You’ll use these references down the file, in the command_data and telemetry_data section:
command_data:

+  simple_robot_app_flight_tlm:
+    structure: SimpleRobotAppFlightTlmt
+    cfe_mid: '0x1839'
+    cmd_code: 1
+    topic_name: 'simple_robot_app_flight_tlm'

telemetry_data:

+  simple_robot_app_flight_cmd:
+    structure: SimpleRobotAppFlightCmdt
+    cfe_mid: '0x837'
+    cmd_code: 1
+    topic_name: simple_robot_app_flight_cmd
You are ready to run!
13.2.4. Step 4: Create a ROS2 node and test communication
Now you can run cFS and the bridge…and you should be getting a couple of ROS2 topics of interest:
flightsystem/simple_robot_app_flight_cmd: Topic on which cFE sends joint command data from cFE to the actuator node.
flightsystem/simple_robot_app_flight_tlm: Topic on which the the joint state is sent from the actuator node back to cFE.
You can write a small ROS2 node to send a joint command and read the telemetry data back. Or, you can use a node we have handy in the brash_application tools package. We’ll use this node for simplicity.
First, we run cFS:
$ cd ~/test_brash/cFS && cd build/exe/cpu1
$ ./core-cpu1 2>&1
You should see some output in the terminal with “SimpleRobotApp” on it.
Second, we run the ground bridge:
$ cd ~/test_brash/brash && source install/setup.bash
$ ros2 launch cfe_plugin cfe_bridge.launch.py
Now can run our ROS2 node on the ground side. One last thing before doing that, though: We need to request the cFS TO_LAB to send the telemetry back to our current IP:
$ cd ~/test_brash/brash && source install/setup.bash
$ ros2 topic pub --once /groundsystem/to_lab_enable_output_cmd cfe_msgs/msg/TOLABEnableOutputCmdt "{\"payload\":{\"dest_ip\":\"127.0.0.1\"}}"
This is only needed once.
We start the SBN bridge on the flight side:
$ cd ~/test_brash/brash && source install/setup.bash
$ ros2 launch cfe_sbn_plugin cfe_sbn_bridge.launch.py
Now we have cFE and both bridges in both sides running. All we have left to do is to run the ROS2 nodes on the ground side and on the flight side:
Ground:
$ cd ~/test_brash/brash && source install/setup.bash
$ ros2 run brash_application_tools simple_robot_app_ground
Flight:
$ cd ~/test_brash/brash && source install/setup.bash
$ ros2 run brash_application_tools simple_robot_app_flight
You should see on the ground side that the telemetry data comes back from the flight side.