13.1. Building a simple app to send/receive command/telemetry data
In this tutorial, we’ll show how to use the BRASH tools to send command and receive telemetry data from a cFS application, using ROS2 on the ground. The figure below shows the setup of our system.
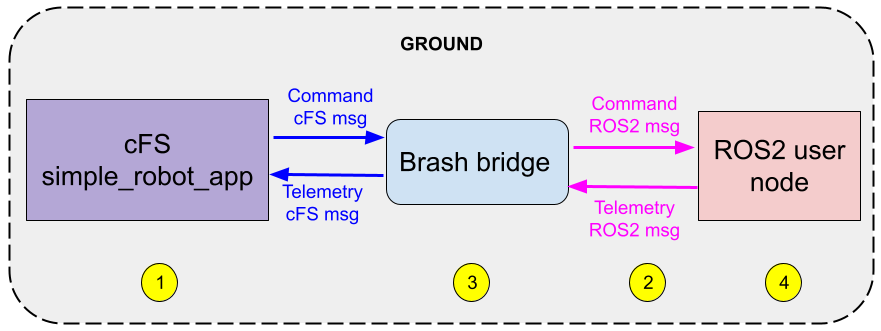
We’ll go through the following 4 steps to communicate our cFS app with a ROS2 app:
Create a cFS app that receives a command (such as a joint configuration goal), and sends back a telemetry message(a joint state).
Generate the ROS2 command/telemetry messages corresponding to their cFS app’s message counterparts, using BRASH tools.
Update the BRASH bridge’s configuration files to be able to use the new ROS2 messages added in Step (2).
Create a ROS2 node that sends and receives the ROS2 command/telemetry messages created in Step (2).
For simplicity, this tutorial can be run in a single-machine setup, so no need to use Docker to simulate different machines.
Note
For this tutorial, we assume you have followed the Installation steps, including the “Optional but recommended”. If you have not done that yet, here is the gist:
$ # Install dependencies and create a work folder (e.g. ~/test_brash)
$ pip install vcstool cfdp libsqlite3-dev
$ cd ~ && mkdir test_brash && cd test_brash
$ # Get and compile cFS
$ git clone git@github.com:traclabs/cFS.git cFS
$ cd cFS && git submodule update --init --recursive
$ make SIMULATION=native prep && make && make install && cd ..
$ # Get and compile BRASH
$ git clone -b main git@github.com:traclabs/brash.git
$ cd brash && mkdir src && vcs import src < https.repos
$ source /opt/ros/rolling/setup.bash && colcon build --symlink-install && cd ..
$ # Get and compile juicer
$ git clone -b archive_unions https://github.com/WindhoverLabs/juicer.git --recursive
$ cd juicer && make && cd ..
After the steps above, you should have a work folder (such as ~/test_brash) containing 3 folders: cFS, brash and juicer.
13.1.1. Step 1: Create the cFS app
Clone We already have the code for this cFS app ready to use. Clone it in the cFS/apps folder:
$ cd ~/test_brash/cFS/apps
$ git clone git@github.com:traclabs/simple_robot_app.git
We now need to integrate the code to the cFS executable with the next steps:
Scheduling : In
cFS/sample_defs/tables/sch_lab_table.c, around line 33 :#include "robot_sim_msgids.h" #include "rover_app_msgids.h" + #include "simple_robot_app_msgids.h" #include "sbn_msgids.h"and around line 72 add the 2 lines:
{CFE_SB_MSGID_WRAP_VALUE(ROVER_APP_SEND_HK_MID), 100},
{CFE_SB_MSGID_WRAP_VALUE(ROVER_APP_HR_CONTROL_MID), 10},
+ {CFE_SB_MSGID_WRAP_VALUE(SIMPLE_ROBOT_APP_SEND_HK_MID), 100},
+ {CFE_SB_MSGID_WRAP_VALUE(SIMPLE_ROBOT_APP_HR_CONTROL_MID), 10},
These 2 lines are telling the Scheduling app to send these 2 messages (SEND_HK_MID and HR_CONTROL_MID) at rates of 100 and 10 ticks per second, respectively. Since the tick rate is 10 ms, this means that the messages will be sent at a rate of 1Hz and 10Hz.
Telemetry : In file
cFS/sample_defs/tables/to_lab_sub.c, add around line 41:#include "robot_sim_msgids.h" #include "rover_app_msgids.h" + #include "simple_robot_app_msgids.h"and around line 66:
{CFE_SB_MSGID_WRAP_VALUE(ROVER_APP_HK_TLM_MID), {0, 0}, 4},
+ {CFE_SB_MSGID_WRAP_VALUE(SIMPLE_ROBOT_APP_HK_TLM_MID), {0, 0}, 4},
{CFE_SB_MSGID_WRAP_VALUE(SNTP_HK_TLM_MID), {0, 0}, 4},
This line is adding the telemetry data message for the SimpleRobotApp (identified with ID HK_TLM_MID) to the to_lab.
Build Add the target simple_robot_app as a target in line 89 of
cFS/sample_defs/targets.cmake(append the end of the list) :list(APPEND MISSION_GLOBAL_APPLIST ros_app sbn sbn_udp sbn_f_remap cf robot_sim rover_app + sntp simple_robot_app)
Link The step above will build a .so file. We’ll need our cFS executable to link to it. Go to
cFS/sample_defs/cpu1_cfe_es_startup.scrand add the line for this app as shown below:CFE_APP, robot_sim, RobotSimMain, ROBOT_SIM, 50, 16384, 0x0, 0; + CFE_APP, simple_robot_app, SimpleRobotAppMain, SIMPLE_ROBOT_APP, 50, 16384, 0x0, 0; CFE_APP, cf, CF_AppMain, CF, 80, 16384, 0x0, 0; CFE_APP, sntp, SNTP_Main, SNTP, 80, 16384, 0x0, 0;
Compile :
$ cd ~/test_brash/cFS
$ make && make install
Test : Your cFS executable should now run the simple_robot_app in addition to the rest of pre-existing applications. To test this, try running the
core-cpu1executable:$ cd ~/test_brash/cFS && cd build/exe/cpu1 $ ./core-cpu1 2>&1
You’ll see in the terminal some debugging lines showing that the Simple Robot app is running:

13.1.2. Step 2: Generate ROS2 messages
Now that the app is integrated in our cFS mission, we can generate the ROS2 messages that will let us talk with it using ROS2 from the ground side.
Generate the juicer database. You’ll have to edit the launch file to add the simple_robot_app .so file to be parsed:
$ cd ~/test_brash/brash && source install/setup.bash $ gedit src/cfe_ros2_bridge_plugin/juicer_util/launch/generate_juicer_database.launch.py
Update the cfs_path and juicer_path to your specific setup, e.g.:
cfs_path :=~/test_brash/cFSjuicer_path:=~/test_brash/juicer
As for the input_list, add the simple_robot_app at the end of the list:
input_list = ['core-cpu1', 'cf/cfe_assert.so', 'cf/ci_lab.so', 'cf/ros_app.so', 'cf/sample_app.so', 'cf/sample_lib.so', 'cf/sbn_f_remap.so', 'cf/sbn.so', 'cf/sbn_udp.so', 'cf/sch_lab.so', 'cf/to_lab.so', 'cf/robot_sim.so', 'cf/cf.so', 'cf/rover_app.so', + 'cf/simple_robot_app.so']
Now, generate the database. It might ask you to create the dbs folder in the juicer directory if it is not there already:
$ cd ~/test_brash/juicer && mkdir dbs
Generate database:
$ cd ~/test_brash/brash $ ros2 launch juicer_util generate_juicer_database.launch.py
Replace the old database with the one you just generated.
$ cd ~/test_brash/brash/src/cfe_ros2_bridge_plugin/cfe_plugin/resource $ ls # You'll see the cfs_bootes-rc1-dev83_TL.sqlite $ mv ~/test_brash/juicer/dbs/combined.sqlite cfs_bootes-rc1-dev83_TL.sqlite
and then run the converter. This will create new .msg files for the app within the cfe_msgs folder. Compile afterwards.
$ cd ~/test_brash/brash $ ros2 launch cfe_msg_converter cfe_msg_converter.launch.py $ colcon build --symlink-install --packages-up-to cfe_msgs
Note that you have to compile the message package after the new .msg files are created. You’ll see that after running the converter, 4 new messages are generated:

13.1.3. Step 3: Update config file for ground bridge
Finally! You’ll need to tell the bridges about your new messages, so they can know to hear for them. For this simple example you’ll need to update the cfe_ros2_bridge, which connects the ground with cfe:
The SimpleRobot app has 4 generated messages. For our purposes of ROS2 comm, we care about these 3:
SimpleRobotAppJointConfigt.msg: Message that stores a joint configuration.
SimpleRobotAppTlmt.msg: Message that contains telemetry data (current joint state) that is sent from cfe to the ground (+ additional cfe telemetry info).
SimpleRobotAppCmdt.msg: Message that sends commands (joint state goal) from the ground to cfe.
We’ll use the last 2 messages to receive the joint state telemetry and send the joint command data to cfe. For this, we need to let the bridge know some info about these messages:
Open the cfe_plugin_config.yaml file:
$ cd ~/test_brash/brash/src/cfe_ros2_bridge_plugin/juicer_util/config
$ gedit cfe_plugin_config.yaml
In the commands and telemetry sections, add references for the first 2 messages:
/**:
ros__parameters:
plugin_params:
juicer_db: ["cfs_bootes-rc1-dev83_TL.sqlite"]
map_ros_name: ["src/cfe_ros2_bridge_plugin/cfe_msg_converter/config/map_ros_name.yaml"]
commands: ["CPU1CFEESStopAppCmd", "CPU1CFEESRestartAppCmd", ...,
+ "simple_robot_app_cmd"]
telemetry: ["CPU1CFEESOneAppTlm", "CPU1CFEESMemStatsTlm", ...,
+ "simple_robot_app_tlm"]
You’ll use these references down the file, in the command_data and telemetry_data section:
command_data:
+ simple_robot_app_cmd:
+ structure: SimpleRobotAppCmdt
+ cfe_mid: '0x1837'
+ cmd_code: 1
+ topic_name: simple_robot_app_cmd
telemetry_data:
+ simple_robot_app_tlm:
+ structure: SimpleRobotAppTlmt
+ cfe_mid: '0x836'
+ topic_name: simple_robot_app_tlm
Each entry has 3 fields:
structure : The name of the ROS2 message generated for this cFE message.
cfe_mid : The identifier for the message, which you must have defined in
simple_robot_app/fsw/platform_inc/simple_robot_app_msgsids.h(and which is used insrc/simple_robot_app.cto create the cfe communication channels).topic_name : Name of the ROS2 topic, if you don’t want to use the default.
Note there is one extra entry (cmd_code) for the command message. Do not worry about this one for now, by default, use 1. This value is used for slightly more advanced cFE integration.
You are ready to run!
13.1.4. Step 4: Create a ROS2 node and test communication
Now you can run cFS and the bridge…and you should be getting a couple of ROS2 topics of interest:
groundsystem/simple_robot_app_cmd: Topic on which the user can send joint command data
groundsystem/simple_robot_app_tlm: Topic on which the user can receive joint telemetry data.
You can write a small ROS2 node to send a joint command and read the telemetry data back. Or, you can use a node we have handy in the brash_application tools package. We’ll use this node for simplicity.
First, we run cFS:
$ cd ~/test_brash/cFS && cd build/exe/cpu1
$ ./core-cpu1 2>&1
You should see some output in the terminal with “SimpleRobotApp” on it.
Second, we run the ground bridge:
$ cd ~/test_brash/brash && source install/setup.bash
$ ros2 launch cfe_plugin cfe_bridge.launch.py
Finally, we can run our ROS2 node. One last thing before doing that, though: We need to request the cFS TO_LAB to send the telemetry back to our current IP:
$ cd ~/test_brash/brash && source install/setup.bash
$ ros2 topic pub --once /groundsystem/to_lab_enable_output_cmd cfe_msgs/msg/TOLABEnableOutputCmdt "{\"payload\":{\"dest_ip\":\"127.0.0.1\"}}"
This is only needed once. Now the telemetry data should be coming from cFS to the bridge and ready for us to query:
$ cd ~/test_brash/brash && source install/setup.bash
$ ros2 run brash_application_tools simple_robot_app_ground
The test node is simply sending a ROS2 command, using the ROS2 messages generated for this application. It does this sending once. Then it subscribes to the telemetry topic and displays the values returned. Note how the telemetry slowly changes towards the commanded value.
